Guidebook Tips: Best Practices for Highlighting Important Content in Your Guide
You’ve spent a considerable amount of time crafting the perfect content for your Guide, but now what? Of course, you want critical information to be easily accessible, but how?
When adding content into a Guide, ensuring that important information is highly visible is a common challenge. Take it as an opportunity. In this article, I will provide a few helpful recommendations for organizing your Guide so that your paramount content has maximum visibility.
Use Quick Info
One of the greatest ways to add key content to your Guide is by using the Quick Info feature. With the Quick Info feature, you can add just about any textual information to your Guide that you would like. A few examples of helpful information that can be included with Quick Info are WiFi details, Exhibit Hall hours, or Accessibility status.
Quick Info sections are made up of three components:
- An icon (There are 63 different icons to choose from, so you will be sure to find one that’s related to your Quick Info section)
- Title text
- Content text
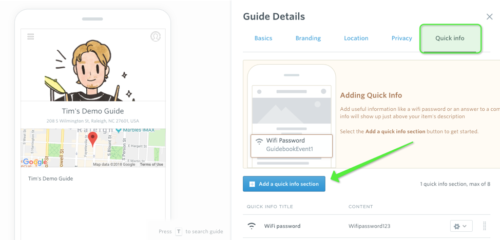
You can add Quick Info sections into a few different places in your guide. You can add them to the General Info feature, custom list items, or schedule sessions. To get started, navigate to one of these areas in your Guide, click on the Quick Info tab and then “Add a quick info section”:
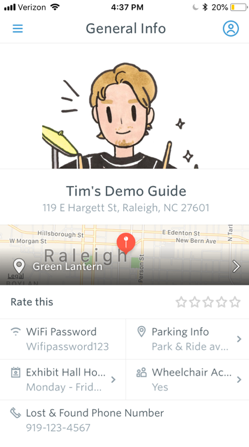
You can add up to eight Quick Info sections to each of these areas. Once you’ve added sections to your Guide, they will look something like this:
Use One Tap Menu Items
Another way to ensure that your users are viewing important content is to create one tap menu items. With one tap menu items, you can pin critical information to the navigation menu, so your users will be able to open it up without clicking through your Guide.
I’ll show you how to utilize the Custom List feature to add content to the main navigation menu.
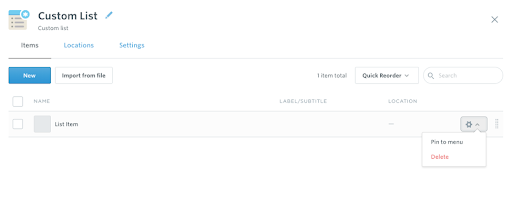
To get started, you will want to create a custom list that will house the content. Next, create a list item for the content that you would like displayed on the main menu. Once you have entered data into the list item, back out to the custom list and click on the gear icon to the right of the list item. Choose the “Pin to menu” option (shown below) to place the item on the main navigation menu for your users to see.
Any changes that you make to the content from the menu or within the list will be reflected in both areas. To prevent displaying duplicate information in multiple places in your Guide, we recommend disabling the list you created. Even though the source has been disabled, it will still be viewable in the menu!
Optimize Module Placement
Lastly, the order of your modules in the navigation menu can play a vital role in getting your information in the hands of your user base. We recommend placing the modules that contain the most important information near the top of the menu. The closer your modules are to the top, the more likely they will be seen by the users of the Guide.
These are just a few ways that you can highlight important content in your guide. If you have questions about this or anything else, please feel free to reach out to us at support@guidebook.com, we are always happy to assist.